Category Archives: technique

Puerto Vallarta

091017pv_sotc

I had frustratingly little time to explore the old town while in Puerto Vallarta last week. It’s a place of narrow streets and twisting lanes where you could wander for hours. Unfortunately I never had hours, but I did manage a little time to get a few photos of the tourism icons like this shot of the Church of Our Lady of Guadalupe. I added a texture layer in Photoshop for a little atmosphere.

A morning with the alpacas

090929alpaca_sotc

I had one of my more pleasant experiences photographing animals this morning at Ad Astra Alpacas. You know what they say about working with kids or animals. Having been a photographer at a “get your picture taken with Santa” booth years ago, as well art directing plenty of dog-and-cat photo shoots for pet food manufacturers… I have some stories. However, I think the alpaca might be one of my new favorite four-legged subjects.

These guys were very calm and didn’t spook terribly easily as long as I kept my movements slow and steady. One thing I did notice early on was that putting the camera to my face would get them a little nervous. I’d move in close and they’d be fine until the camera came up and then they would shy away a bit. On the other hand, if I held the camera out low, they would become curious and lean in to inspect it. My most successful shots came from shooting blind using this technique with my 17-35 racked out wide and an f-stop of at least f/8 to give me a little depth of field latitude.

This shot was made earlier on when I was still getting the system down. I was at f/3.5 here and got lucky that the focus point caught the eye but I do like the shallow focus on the fence.

Grape harvest

090928vineyard_sotc

Yesterday morning found me back at Holy Field Vineyard and Winery, shooting the harvest. The grapes weren’t quite ready for last week’s visit but this time the parking area was crowded with cars and the fields filled with people picking and toting fruit.

I went to the ground for this shot and held my D700 with the 17-35 Nikkor down in the grass, blindly pointed upward. I had imagined the shot as being a silhouette as the sun was directly behind the central worker but once I opened the file in Adobe Camera Raw, I was amazed at how much detail I could actually pull out of the shadows without losing the blue sky. In the past I’ve found that the Fill Light slider would create some weird outlines along high-contrast edges if taken past 10 or so. Here I’ve cranked it up to 54 and things look fine. I’m not sure if that’s an improvement in ACR, or the D700’s files can handle it better, or if this particular shot is more forgiving. At any rate, the recovery is amazing.

That sun sure moves fast

090925fifteenth_sotc

On our way to the farmers’ market on Saturday mornings, I turn onto 15th street and see this view toward the campus of the University of Kansas. It’s always just around sunrise and the big orange ball of the sun is rising behind the twin towers of Frazier Hall. Last Saturday it was a particularly good sky — slightly overcast so that you could look right at the blood red sun. It was rising just to the left (north) of Frazier and I decided that I would start walking up to that spot in the mornings to see if I could get a photo when the sun appeared directly between the towers.

Six days later, I finally managed to have a clear-ish sky and the time available to make that walk. It was a nice morning — not quite as interesting as last Saturday — but I figure I’ll do this somewhat regularly to try the same scene in different qualities of light.

Above is a shot from just before sunrise this morning. I was initially surprised that, when the sun came up, it was already to the right of the towers. Then I remembered my lunch with a photographer friend yesterday who was telling me about his recent project of shooting prehistoric solstice markers. He was in town because he had just finished shooting a couple of them earlier in the week.

Duh. The Fall equinox was last Tuesday. 15th Street, being an east-west street, would be aligned to the sun on the equinox. I was three days late. Thinking back, Tuesday morning was dreary and rainy so I didn’t miss anything. Still… another thing to add to my shoot calendar for the Spring equinox next year.

Eatin’ fire and spittin’ out razors

Just another lazy night in the ol’ home town. Wandered down to Mass. Street last night to catch the second annual Busker’s Festival and grabbed a few shots of the street performers…

rope tricks

fire eater

eating fire

These were all shot on my Nikon D700 at ISO 800. Then I ran into Doug, who goaded me into using ISO 6400 for the first time…

spitting out razor blades

two eating fire

Somehow I don’t think it will be the last time I tread in that high-ISO territory. The results were remarkably good. Thanks, Doug — looking forward to seeing some of your shots!

Playing with my food

cherries

I needed a shot of some cherries for an upcoming episode of our vidcast, Travel by the Pint, today so we made a quick run down to the local grocery store and picked up a bag. Back in the “studio” (more of a spare bedroom, really), I set up a small light table left over from slide sorting days and leaned a large piece of light blue paper up about three feet behind it to give a nice color contrast to the red and yellow fruit.

I placed three cherries on the lightbox and turned it on. A window to the left added a highlight to the upper left side of the cherries but didn’t light the background paper enough to balance the brightness of the lightbox. I popped up the on-board flash on the D700 and used it in commander mode to control my SB600 which I held over the cherries, pointing toward the backdrop. I had a diffusion dome on the flash to help soften and even out the background light and it also added another little highlight to the top of the cherries.

Shooting with a Nikkor 60mm macro lens, I set the aperture to f/8 to ensure the cherries would be in focus but the background would be softly blurred. I also wanted the black edge of the lightbox to be out of focus so that it would become an abstract stripe rather than a recognizable piece of metal edging.

I shot several other versions — and this is actually not the one we’ll use — but I thought I’d share it here as an example of how a few items from around the office can come together for make a quick graphic image. All in all, the whole shoot took maybe 15 minutes. And I end up with some nice stock images and a snack for later.

Dynamic range

Mosque of Mohamed Ali in Cairo, Egypt

Back in the days of film, I shot only transparency — and in the latter days, primarily Fuji Velvia which was very contrasty and had rich, almost unnaturally saturated color. Transparency film was unforgiving and had very little dynamic range, meaning that it could only record a small portion of the range of lights and darks that you could see with your eyes. While digital still is far from being able to record an image with as wide a contrast range as the eye, it’s closing the gap. As I’m processing my photos from Egypt, I’m seeing that my new Nikon D700 has closed the gap even more.

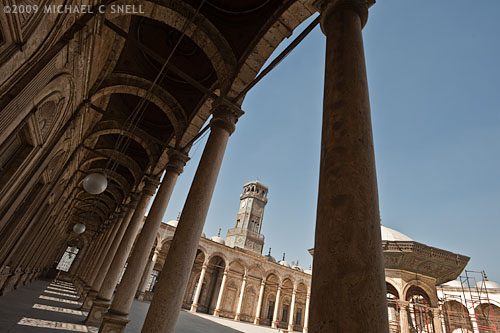
I would have been hard pressed to get the shot above back in my film days. The sun was blazing and the contrast between the brightly lit stone in the courtyard of the Mosque of Mohamed Ali in Cairo’s Saladin Citadel and the shadows in the upper reaches of the surrounding arcade was huge. Still, with some minor tweaking in Adobe Lightroom 2, there is detail in every nook and cranny (reducing the image for the web has crunched the contrast a bit again but, trust me, the full size image has a ton of detail).

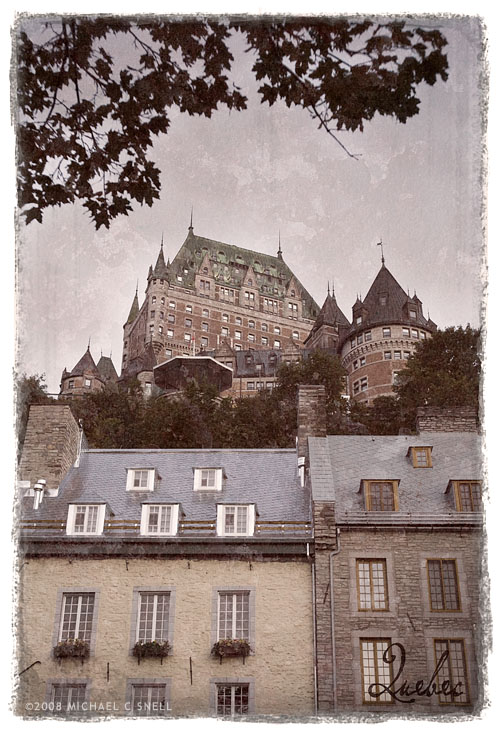
The camera doesn’t make a great photo, the photographer does. But a good camera can enable a photographer to capture scenes that would otherwise have been nearly impossible. I consider it a partnership. Technology is a tool like any other and I’m happy to make use of it.

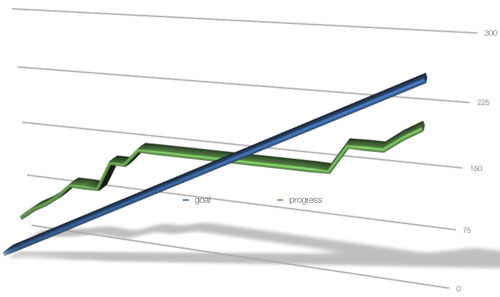
update: I lost momentum on my Alamy goals while in Egypt. You can see by the chart below — the steady line is my goal of 10 images keyworded per day, the green line is my actual progress. I was ahead of schedule before Egypt but the flat section shows my lack of progress while I was out of the country. Time to make up for lost time now.
progress chart

Homage

AppomattoxWatched “The Assassination of Jesse James by the Coward Robert Ford” last night and was awestruck by some of the film’s imagery. It’s not at all what you would consider a typical western and it’s not something to watch if you’re interested in historical accuracy (Alberta, Canada, and the Canadian Rockies serve as the backdrop for scenes that took place in Missouri and Kentucky, if that gives you a hint) but it sure is purty. So purty that I felt compelled to make my own little homage to the movie’s warm, yet desaturated, color palette.

I grabbed this shot at Appomattox Courthouse where Lee surrendered to Grant, effectively putting an end to the American Civil War. Seemed an appropriate photo. I didn’t quite get the feel of the film but, hey, I only had a few minutes available. If you want to see the real deal, rent the movie. Just make sure you have a full evening ahead of you. It’s a long one.

Texture experiment #152

Texture test

I’ve long been interested in finding a way to get that messy edge similar to what you see on Polaroid transfers but I want to achieve it in Photoshop and in a way that I can easily reproduce it without having to go through too many steps. Today I revisited this project and moved a little closer to my goal. Through the use of various texture shots I’ve collected over the years, masks made with rough-edged brushes and a liberal use of layer blend modes, I can now drop any image into this Photoshop document and it will give the above result with minor tweaking.

It’s still not entirely what I was shooting for. I wasn’t initially going for the overall aged look — I just wanted the edge. But, to my eye, the edge fit better when I textured the entire image. I’ll keep playing with it. Every attempt comes closer…