Category Archives: photoshop

The Alhambra, Day 2

140614charles01_sotc

It’s always great to get a second chance to photograph a place. The first visit is about discovery and it’s sometimes overwhelming as you try and take everything in. The return visit is often more about details or things you just didn’t see the first time. Different light conditions and weather can also dramatically change how a place looks and feels.

My second day in Granada, Spain, began with a return visit to the Alhambra. This time the first stop was the Palace of Charles V — a building I had bypassed entirely on my first visit. The main space is circular and ringed by a colonnade. Around the periphery are smaller rooms like this one with the staircase (This is actually three photos stitched together in Photoshop):

140614charles02_sotc

It was hard to get the main courtyard all in-frame and to show it full circle. I went to my rarely used fisheye for this shot and actually like the distortion it creates. I had used this lens in a circular Art Deco church in Tulsa in April, and realized that the distortion is less confusing in round spaces. One of those little tidbits I’ll file away for future shoots. You never know when you’ll find yourself in a round room, right?

140614charles03_sotc

After the Palace of Charles V we followed much the same path on this visit as I had taken on Day 1. Here are just a few more shots of things I saw differently this second time around:

140614alhambra01_sotc

140614alhambra02_sotc

This next photo really shows the advantage of visiting at different times of day. I had photographed this room the afternoon before but the light was not coming through the stained glass as it did this following morning. The patches of colored light on the wall add an altogether different feel to the image and tells more of the story of what’s going on outside of the frame.

140614alhambra03_sotc

More Granada to come…

Kansas State Capitol

140415capitol04_sotc

For five years I had an office just around the corner from the State Capitol in Topeka, Kansas. At the time we signed the lease on the place in 2003, I thought it would make for a great opportunity for me to build my library of Capitol photos. After all, I’d walk to work every day so I’d pass the building several times a week in all sorts of weather. What I didn’t realize was that the Capitol was about to undergo a long, long renovation. A renovation that would have it covered in scaffolding for the bulk of the time I officed downtown. When we moved to Lawrence six years ago, it was still impossible to get a clean shot of the most iconic building in Kansas. Only a few weeks ago did the work finish and the scaffolding and cranes came down. In the end, the copper on the dome had been replaced so the green patina is no more and the dome now has the dull sheen of a new-ish penny.

I photographed the interior a couple of weeks ago but with Spring finally arriving, I decided it was time to get back to updating my exterior photo files. Any photos of this building made prior to 2014 are now dated due to the new dome, so I’ll be continuing to revisit the Capitol many times in the coming year(s). Last night I got started by setting up shop on 9th Street — probably the best view of the Capitol if you want to see it in context to downtown. Until about 10 years ago, this was the one downtown intersection that still had historic buildings on all four corners. The northwest corner (in the distant right in this view) has since been redeveloped with a retail/parking structure, but this angle still remains one of the most “historic” views.

Here are a few more images made while waiting for the sun to set last night and experimenting with some different post-processing effects. All are from more or less the same position but shot with lenses of different focal lengths, each giving more or less prominence to the Capitol in relation to the other downtown buildings.

140415capitol02_sotc

140415capitol01_sotc

140415capitol03_sotc

140415capitol05_sotc

Mexican Rodeo at Rancho Ochoa

130418halo_sotc

The folks at the family-owned Rancho Ochoa rodeo arena in West Phoenix were kind enough to allow myself and a few others to photograph them as they prepared for their upcoming competitions. Special thanks also to Jill Richards for providing the backdrop and light modifiers that made for some fun, impromptu portrait sessions with the individual charros and charras. I loved the gold rim on the hat in the shot above and decided to try doing a little black and white toning to the rest of the image, finishing it with an aged film texture.

Here are a few others from that evening:

130418roping_sotc

130418riders_sotc

130418shadow_sotc

130418cowboy_sotc

Unintended portrait subject

Sorry. I usually try to avoid posting cat photos (the interwebs seem full enough of them already) but this one has a story behind it. My wife/business partner needed a new headshot and, as I was setting up the lighting, our cat Piña decided to make herself available as a stand-in while I got everything situated. She was a real pro. She hopped right into the chair and waited patiently as I made test shots, adjusted lights, etc. until everything was set for the real shoot.

I liked this shot in particular because it feels so formal. I added a bit of an oil-painting filter just to push it a bit further into the realm of those thoroughbred horse portraits. I think it would be perfect in a gilded frame, hanging above a cherry wood humidor full of Cuban cigars.

Photoshop CS6 public beta

Just to further distract me (and yes, I’m sure that it is all about me), Adobe has released a public beta version of the new Photoshop CS6. How could I not download it and how could I not wasted endless hours checking it out? Happily I had some real work that I could use it for… which I did… and then I started playing around with the fun stuff. Lo and behold, who knew there was a new Oil Paint filter? I had to give that a go and the result is what you see above — a stylized and slightly Tim Burton-esque view of the redbud tree blooming in my backyard. It’s probably a little hard to make out all of the paint effects at this size but, trust me, there’s some cool stuff going on in there. This warrants further investigation.

So far I’m less impressed with the new Content-Aware Move Tool, but I also found an additional set of controls for it that may make me change my mind. Chalk today up to one, big productivity loss… I mean… professional development opportunity.

Rainy day strategies

[sponsored post]

Stewart Island lies off the southern tip of New Zealand’s South Island. In this shot we’re just over the peninsula from the Island’s one town, Halfmoon Bay, and are overlooking Golden Bay, Thule Bay and the Paterson Inlet. Today’s destination is Ulva Island — a small, 670 acre island in Paterson Inlet that is being restored to its original predator-free ecosystem.

It’s also raining, which can make shooting photos during our walking tour challenging. I don’t have any waterproof housings but I do have a jacket and opt for a two body, two lens operation today. I’ll take the Nikon D700 with a 60mm macro lens and the D7000 with the Tamron 18-270. Here’s my thinking:

We’ll largely be in fairly dense rainforest where the reduced contrast of the overcast sky will actually help even out the light. I won’t want to include a lot of sky in any shots since it’s flat grey so I will instead focus on details — macro shots of the plants that we encounter on the walk. It will also allow me to shoot downward for the most part, eliminating the problem of rain getting on the front element of my lens. Neither camera-lens combination is large, so I can keep them both tucked into my partially zipped jacket and retrieve them only when needed. The second body with the 18-270 will be reserved primarily for those times when I encounter something that suddenly requires more than a prime 60. That might be a wide shot where the trail opens out onto a beach, or a telephoto shot of a bird. Birds are a large part of the visitor experience to Ulva Island so I hope to get something along those lines. By taking the 18-270 and a macro, I figure I’m set for nearly anything and I won’t have to deal with changing lenses in the rain.

Overall, this plan worked well. Once we made our way off of the beach and into the understory, the rain effect was lessened by the trees overhead, although the occasional drop that would land now was a much larger drop from a leaf than the small, misty raindrops on the beach. The trails wound through ferns and forgotten-looking plants that gave a real sense of what New Zealand must have once been like, before the main islands were largely cleared of trees for cultivation. I’ll show some of the macro shots in the next post but first I’ll show a couple of shots that made me thankful to have had the 270 end of the Tamron 18-270 zoom.

This tiny bird is a Toutouwai, or Stewart Island Robin. On the much larger end of the scale is this South Island KaKa:

A member of the parrot family, Kakas are about 18″ long and weigh a pound on average. That’s a pretty sizable bird. The Kaka didn’t come nearly as close as the Robin. There was another group a few yards ahead of us that he was curious about but the addition of our group coming up behind eventually proved too much and he took off. I was happy to get the images I did with the 18-270, but can only imagine the shots that a person could get with a little more time and patience on this island. For the most part, the birds are not that suspicious of people and will come fairly near. The haven’t really learned fear.

In the next post, I’ll share a few of the detail shots I took on this hike with the macro. Given the weather and limited time, I think the two lenses really allowed me to cover a lot of ground photographically speaking.

I should also mention one other foul-weather tip — the landscape at the top of this post (also shot with the Tamron 18-270) was fairly grey and colorless due to the overcast skies and impending rain. Once I brought it into Lightroom, I opted to alter the white balance to give the scene a cooler, blue cast. The result resembles the light you might get just before dawn or after sunset, even though it was shot near mid-day. Filters can also be used on-camera for this effect but, anymore, I prefer to leave my options open for playing with different color temperatures at the point of post-processing instead. By shooting in RAW, I have the ability to make several versions in different tones without any damage to the original image. One of the great benefits of today’s digital photography tools.

Yellow-Eyed Penguin encounter

[sponsored post]

It all started when we visited the fossilized forest at Curio Bay on New Zealand’s southeastern coast. In the photo above, you can see one of the ancient, petrified trees that are visible in the rock at low tide. We were told that the endangered Yellow-Eyed Penguins are frequently spotted in the area but that they are usually only making their way between the ocean and their nesting areas at sunrise and sunset. As we were there near mid-day, it was doubtful we would see any. If we did, however, signs instructed visitors to keep at least two car-lengths away to make sure the penguins could go about their business undisturbed.

Wanting to get clear of the bulk of the tourists at the site, I picked up my pace and headed for the far end of the rocky beach where I found some great examples of the petrified logs and stumps and began photographing them. A few moments later, a sound caught my attention and I looked up to see two Yellow-Eyed Penguins emerging from the underbrush at the top of the beach.

One was more bashful and stayed in the shade but, as I continued to photograph them, the other made his way cautiously onto the beach. I picked a location where it looked like he would cross my path, but where he wouldn’t come so close that I would disturb him. Once again — as had happened on several occasions on this trip — I was happy to have brought along my Tamron 18-270mm zoom lens. I hadn’t been expecting to be photographing wildlife at this location and had nearly come to the beach with only a 17-35. Luckily I’d decided otherwise and now the 270mm end of the Tamron was just what I needed.

I wasn’t too aware of what was going on behind me until the penguin had gone and I turned around to leave. It was then that I noticed that a large group of people had assembled behind me and had been photographing the penguins as well. One was a fellow photographer from my group who had, unfortunately, come to the beach with only a 60mm prime lens. He’d made do and gotten some nice shots but he certainly didn’t have as many options available to him as I had.

Here are a couple of shots — first, just as the penguin re-emerged after walking behind a large rock:

That shot’s cropped a bit, but it’s sharp enough to handle it. I mainly cropped it to get rid of some distracting gull poo in the foreground. Proof that you can’t control everything in the scene. The next shot is closer to full frame but is also cropped a small amount just to get rid of some visual noise around the edge of the frame and also to show the penguin a bit better at the small size required by this blog template:

I don’t generally like to crop photos after they are shot. Coming from a background of shooting transparency, I learned to crop in-camera. It was a necessity. I’m only recently embracing the ability to crop and re-frame images in Lightroom or Photoshop. Files captured by modern DSLRs are now large enough that there is some lee-way. You can crop an image down a bit and still have a reasonably large file that will be viable as a stock image. I continue prefer to “get it right” in-camera whenever possible, but it has become a welcome byproduct of digital photography that I can now tweak an image’s crop later to make it stronger. Especially in situations like this where time was limited and I wasn’t able to reposition myself or to get closer just to eliminate some distracting element in the foreground or background.

Resurfacing

After a tough few weeks, I’m returning to a somewhat normal schedule. Some would argue whether I ever operate on a “normal” schedule, but at least things are becoming more normal by my own warped standards. One part of what I like to think of passing as a routine is my morning walk. They’ve been few and far between lately, but the weather — and life — has been cooperating recently and I’m trying to reawaken the habit.

I sometimes build additional purpose into these walks by taking a camera along to experiment with a new lens or technique. On this particular recent walk, I limited myself to my Lensbaby Composer and my D700. The shot at the top of this post was created by swinging the camera downward during a .6 second exposure. I wanted to abstract the scene of grass and tree trunks to its essence and I’m pretty happy with the result. It took more than one try, but this is actually pretty close to what I was looking for.

The shot of the tree was pretty straightforward until I applied some textures in post using Photoshop CS5. And here’s one more Lensbaby shot that sums up the serenity of a pre-dawn stroll:

Lightroom 3: noise reduction

100911candles_sotc

In 2006 I was in Santiago Chile shooting with my new-ish Nikon D200 and I found myself in the dark interior of a 400 year old church. It seemed like the ideal time to play around with the improved high-ISO capabilities of that camera. Back in the film days, I used to shoot with Fuji Velvia that I rated at ISO 40 nearly all the time. I did everything I could to avoid film grain and stepping up to an ISO 100 film was almost extreme for me. As I recall, my D100’s lowest ISO was 200 and it seemed really extravagant at the time to have all that headroom. I rarely moved off of 200, though, as the noise would creep in at 400 and especially noticeably by 800. The D200 had a lower minimum ISO of 100 and felt more in my comfort zone but there were tantalizing reports that it even gave good results at ISOs of 1600 and higher. Each successive body I’ve owned has improved even further but I still tend to stay at minimum ISOs as much as possible. Old habits I suppose, but I just don’t like the look of digital noise at higher ISOs and I like my RAW files to start out as clean as possible.

But back to that church — I didn’t have a tripod with me so I decided to experiment with higher ISOs to at least be able to capture something in that dark, candlelit interior. This shot of the candles themselves was taken at ISO 1600. It was a decent image when I processed it at the time, but there was some noise. I didn’t think much more about it until I was importing my Chile shoot into Lightroom 3 over the last couple of weeks and I decided to give the new noise reduction controls a test.

Here’s a crop at 100% of the image with noise reduction off:

100911noise_off_sotc

And, to keep these side-by-side in the post, here’s a crop with it on (I’ll explain more after the image):

100911noise_on_sotc

I’ll be the first to admit that this is not a true, scientific test. To be honest, I could have had a better result than that first crop four years ago if I had applied the noise reduction tools that were available at the time. What’s more, I’ve actually increased the noise issue a bit due to some exposure compensations that I’ve made in Lightroom. The idea here is just to show how much noise was in the RAW file, and how much Lightroom 3 was able to remove.

I’ve also really cranked up the noise reduction in Lightroom on the second shot. It’s more heavy-handed that I would typically use but, again, I wanted to kick the tires and see what she’d do. Luminance is maxed out at 100 in that second crop.

Is it perfect? No. There’s a bit of a painterly quality to the gradations, but it’s pretty amazing. You could continue to tweak the settings and maybe even add just a touch of LR3’s new Film Grain to disguise some of those gradation artifacts but, as a quick-and-dirty test, I’m impressed by the possibilities. I’m sure I’ll still stay in the low end of the ISO range 95% of the time, but I certainly won’t let dark conditions prevent me from shooting anymore. It’s comforting to know that even if the results aren’t great now, in four years your tools may improve to the point where you can salvage those images.

And if you’re wondering why I would add film grain after trying so hard to disguise high-ISO noise, it does seem counterproductive but it’s a technique I’ve used for years to disguise areas of retouching. Sometimes you’ll need to add a gradation to a sky or something of that nature and the retouched area looks smoother and more noiseless than the rest of the image, calling attention to your efforts. Adding a little noise or grain will unify the original image and the retouch and make everything blend. In small doses, that added grain never shows up on output. Maybe that will be the subject of a future post…

Lightroom 3: perspective correction

100705correctedandcrop_sotc

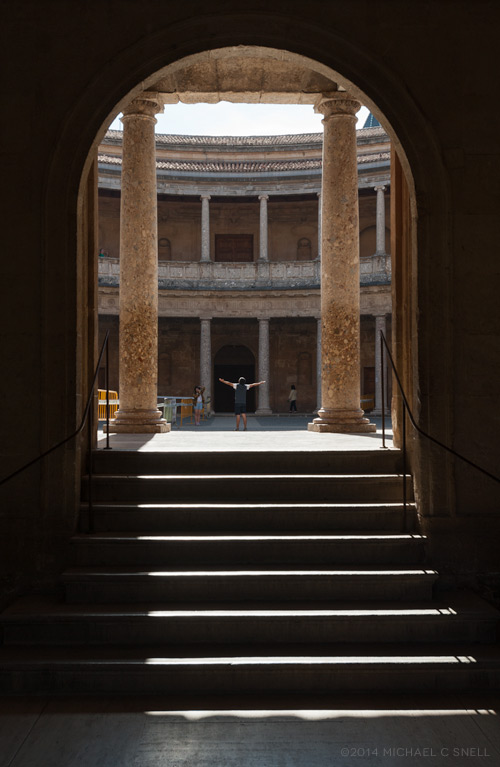
The new lens correction tools in Lightroom 3 bring perspective correction to the RAW workflow. Previously, I’ve had to go into Photoshop to make these corrections, but now they can be done right inside of Lightroom, which saves a few steps. However, I still prefer the Photoshop controls over those in Lightroom. I’ll try and explain why…

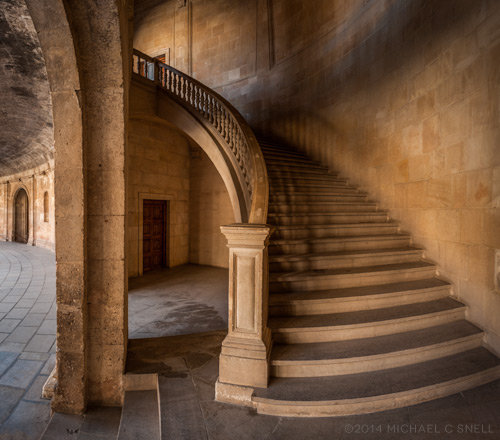
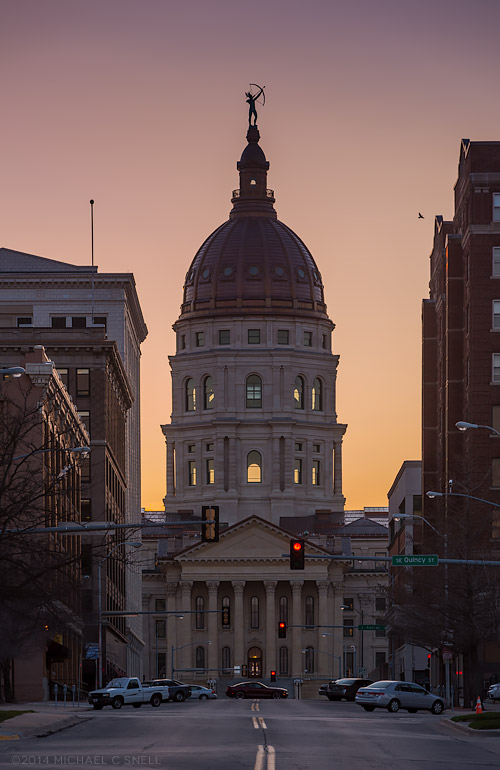
The image at the top of this post is the image after correction in Lightroom. Here’s the original image:

100705uncorrected_sotc

You’ll notice that the windows are tilting in toward the center of the frame — it’s perhaps most noticeable on the far right side where the edge of the building is leaning in as well. I take a lot of these kinds of shots and do my best in the field to keep everything straight in-camera, but sometimes you’re in a tight spot. Shooting wide and looking slightly up… you’ll get this kind of distracting distortion. A tilt-shift lens or a camera with bellows would take care of the problem, but you don’t always have that option available so it’s nice to be able to solve this issue via software.

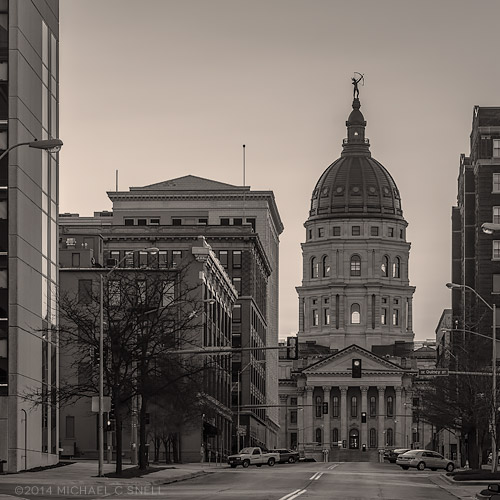
In Lightroom, you have a pair of sliders for vertical and horizontal correction. Moving these sliders creates an effect similar to tilting a print in your hands side-to-side or up-and-down. If you ever controlled perspective shifts like this in the darkroom by tilting your easel, you’ll be familiar with the effect. It works reasonably well but it’s a little like a funhouse mirror and any large movements introduce some strange, new distortions. In the end, you have something that looks like this:

100705correctednotcrop_sotc

The vertical and horizontal lines are now straight (except for the sidewalk which, in the case, actually did run downhill like that) but you’ll notice that we now have grey “background” showing on the bottoms and sides of the images. Lightroom makes its perspective corrections inside the frame so you end up with an image that is smaller than the canvas size, to use Photoshop terms. You need to crop the image down to get rid of these grey wedges. Not difficult, but another step.

I’ll use this method a lot I’m sure. It’s really convenient to have this ability inside Lightroom. However, my preferred method of perspective correction is still part of Photoshop: the Distort control under Edit > Transform.

I turn on the grid in Photoshop first, to better see where things are skewed. Then, Select All and you’ll get corner handles on your image. It’s best to be zoomed out so that you can see some free space around the border of your image. By clicking and dragging these corner handles, you can stretch the image into alignment with the guides:

100705pscorrection_sotc

You can see the top-right handle has been pulled beyond the image frame here, eliminating the left-tilt of the right side of the building. The image will not show beyond the edge of the frame but the data is still there if you drag the corner point back. This gives you a live preview of what the final, cropped image will look like. Better yet, we’re making this correction to the outside of the frame so that there is no need to crop the image afterward. The perspective correction and crop are being handled simultaneously and there is no chance of an edge artifact getting left in your final file.

There is a Perspective control in the Transform group as well, but I generally prefer Distort. The reason is that Perspective tilts the image plane like Lightroom does — symmetrically. If I tug the right side out, the left side will move correspondingly. With Distort, each point moves individually — move the top right handle and only the top right corner distorts. I find this much more useful because the corrections I need to make are not always symmetrical.

Lightroom has a good set of correction tools — there are rotate and pincushion corrections there as well — but I’m glad to have the ability to go to Photoshop to fine tune images when needed. If I can do 90% of the image correction I need in Lightroom, I’m happy to jump over to Photoshop for the last 10%. No tool can do everything. When they try, they get incredibly bloated. Honestly, I kind of hope that Lightroom never adopts layers, etc. Keep it simple and I’ll go to Photoshop when necessary. The two programs work very well together.