Category Archives: lightroom

Shooting tethered

130323robot_sotc

It’s snowing outside so I’m playing indoors today.

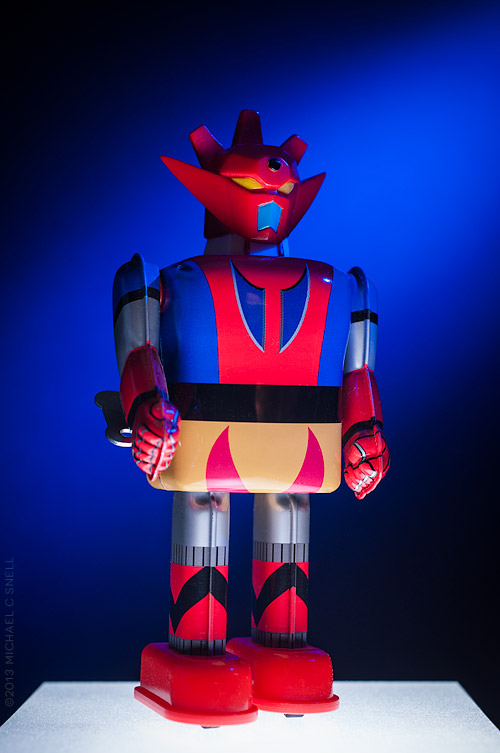
I’ve been setting up my new 13″ Retina MacBook Pro and ran across an article about shooting tethered in Lightroom 4. I thought I’d give it a try, even though I only do a small amount of studio photography compared to field work. For some reason I always thought that tethering would be a lot more involved than it turned out to be. In fact, all I needed was a USB cable to connect my Nikon D700 to my MacBook. Turn on the camera and open Lightroom and, under the “file” menu, you can initiate tethering. Lightroom found the camera automatically and in no time I had a little toolbar added to my Lightroom interface that showed my camera settings: shutter speed, aperture, white balance, etc. Here’s a glimpse of the setup:

130323robot2_sotc


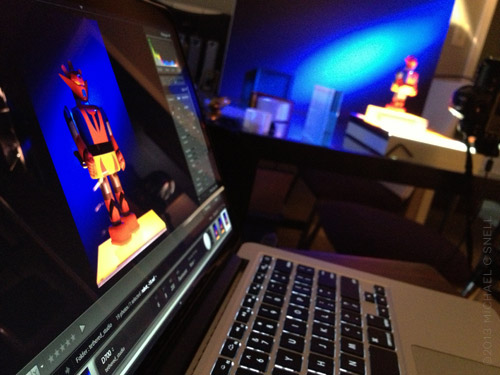
The Lightroom toolbar has a shutter button so you can fire the camera from the laptop. Hit the button and the camera makes an exposure that is immediately transferred to the laptop and opened for review right there in Lightroom.

I know. Lots of photographers have been doing this for years and it’s nothing new, but it was a revelation how easy it was to set for a first-time user like me. I’m reminded of the first time I realized that my Nikon had a built-in intervalometer for shooting time-lapses. More and more often, features that used to be costly added expenses are now built into modern gear, although sometimes they’re not heavily promoted. It pays to noodle around a bit every now and then to see what wonders are hiding in those electronics.

You know, I was thinking that this tethering feature wouldn’t be all that useful in the field but, now that I think about it, it could be extremely handy when doing things like night photography. I know when I was shooting the Milky Way in western Kansas last summer, it would have been nice to have had a way to be able to check exposure and focus during the shoot better than I was able to do on the camera LCD. The USB cable travels with me anyway, so this capability comes at no extra expense, weight, or bulk. Just the kind of thing I like.

Gypsum Hills of Kansas

I spent a couple of days on the road last week with my friends over at Gizmo. They were documenting the Gypsum Hills Scenic Byway and I tagged along to grab some fresh stock photography. I hadn’t been on the backroads in this part of south-central Kansas for a few years so it was fun to reacquaint myself with one of the more unusual scenic regions of the state. I found some of my old favorite spots nearly unchanged and others — like my favorite little reflecting pool — to be entirely missing. The formation above was a new surprise. I’d been down this particular road before but evidently not quite this far because I don’t recall ever seeing that balanced rock before. As much as I’ve traveled this state, it is surprising to continue to run across these little treats. You’d think I’d have found them all by now but that’s the beauty of Kansas. The longer you look, the more you see, and exploration is nearly always rewarded.

On other fronts, this seems to be the season for software issues. As I mentioned previously, it appears that my recent WordPress update has disabled the comments on this site. I’ll continue to try and rectify that situation but I’m also investigating new platforms for some new features that I hope to add to my website yet this year.

I’ve also been working toward upgrading all of my Adobe software to CS6. I’m already running Lightroom 4 and have been using the beta version of CS6 for weeks but as of the end of May, the beta version was discontinued since the final version had been released. My transition was slowed somewhat this time due to a special offer I took advantage of where I was able to upgrade to CS5.5 in early May and a free update to CS6 would be provided by the end of May for me to download. Given the amount of Adobe software that I use, this added up to a substantial discount so I purchased my CS5.5 upgrades and waited for my download link for 6 to arrive. By May 30, I still hadn’t received it. I contacted Adobe and they manually added me back into the system and I finally received my link last thursday. On Saturday, I worked through the update process and it went very smoothly (thankfully). Until Mountain Lion is released, that should be the last of my upgrades for awhile. Good news, since I now need to get up to speed on all of the new features of the entire Adobe Creative Suite. At least I have a head start on Photoshop, having used the beta. All-in-all, it feels good being caught up again and feeling like I can get back to work.

Balloonfest

A shot from last weekend’s Balloonfest in Anthony, Kansas. Lightroom 4’s new “shadow” slider really brought out the detail in the dark portions of the image. I pushed it a little further than I normally would because I liked the way it affected the faces. They almost look like characters out of a Thomas Hart Benton painting to me.

New Orleans revisited

Now that I’m running both Lightroom 4 and Photoshop CS6 (if only in beta), I’m going through old files to see what the new software can do for some images that I never quite felt were finished. Back in the days of the darkroom, it was a good idea to work a print and then set it aside for a time before coming back to it, reassessing, and trying some new ideas. That’s basically the way I treat digital files as well. I process them almost immediately after capturing them, but I like to come back later to take a fresh approach. These files from New Orleans are from 2006, less than a year after Katrina hit. We made the visit with a group of journalists at the invitation of the tourism bureau to help get the word out that the main tourist areas were largely unaffected and open for business. The impact in tourism numbers was very evident, however, in the quiet streets and restaurants.

In reprocessing these images, I tried to focus on that quiet feeling of a nearly abandoned city. The texture of New Orleans also comes through. It’s an old city by American standards and after all that it had been through it seemed to be feeling its age. I look forward to my next trip there, to see what has changed in six years.

Lightroom 4 beta in the real world

I had an architectural interior shoot this week that provided me the perfect opportunity to put the Lightroom 4 beta through its paces in a real-world situation. Much as I would love to move my entire collection over to LR4 right now, it is still only in beta. The prudent thing is to wait until the official release and, in the meantime, just test some duplicated files that don’t risk anything if there is a problem. But this was an isolated shoot that I could easily break out of my catalog and wouldn’t cause any real harm — even if I ended up having to reprocess it entirely at some point down the road.

As I’ve mentioned before, there is some relearning to be done between LR3 and LR4. There were a few times that I found myself moving the black slider to the right, expecting my blacks to get darker and momentarily being surprised to see them get lighter. When I think about it rationally, though, it does make more sense having all the main develop sliders zeroed out at their centers so that they all react the same way when moved right or left. After an hour or so, it was all feeling very natural and I imagine I’ll be messing up in reverse when I go back to Lightroom 3 now.

A few things really stood out to me in this experiment. First, Lightroom 4 beta just seems to handle major adjustments much better than previous versions. I was able to pull highlights back much further than it seemed I could before, and the result looked more natural. The situation I was shooting in was extremely contrasty. It was a fairly dimly lit interior and outside there was a thin layer of clouds that gave the sky that intense white that is always difficult to hold. Because of this, I was shooting 3 to 5 images bracketed, thinking that I’d most likely have to use some HDR techniques to keep detail in both the sky and the darker areas of the interior. As it turned out, I was able to manipulate the middle image of the bracket alone — in every case — using only Lightroom’s exposure, highlights and shadows sliders. I never had to resort to using the under- and over-exposed versions to make an HDR image.

Another feature of the Lightroom 4 beta that I found extremely useful was the ability to adjust the white balance of graduated and spot adjustments. Take the photo above — the left side was a darkish, tungsten-lit interior that was very warm. The light coming in through the windows at the right was very cold due to the cloud cover. The result was an image that shifted drastically from warm tones on the left to much cooler tones on the right. By adding a graduated adjustment on the right that had a warmer white balance, I was easily able to even the scene out.

I’m already totally invested in this new version of Lightroom and am eagerly looking forward to its full release. The new processing engine alone is worth the cost of an upgrade to me and the new features will be a fantastic bonus.

Re-learning to ride a bike

Things generally slow down for me around the holidays and it takes a while for business to get back up to speed again afterwards. That pattern works well for me. I like to take that “quiet time” to re-focus on the coming year and to catch up on in-house activities like self promotion, learning new skills, etc. There’s more of that than usual going on this year, but one unexpected addition came along earlier this month when Adobe released a public beta of Lightroom 4.

There are plenty of Lightroom 4 reviews and introductory videos online already (like Julieanne Kost’s video overviews here) so I won’t go into detail at this point. I’ll do some deeper reporting once the final version comes out as some changes may still occur prior to that launch. For now, I’ll just mention some overall thoughts I’ve had as I have begun to explore the new interface.

And there are some significant changes to the interface — especially to the Develop Module’s Basic panel:

That’s Lightroom 3’s panel on the left and beta 4 on the right. As you can see, the Recovery, Fill Light, Blacks and Brightness sliders have become Highlights, Shadows, Whites and Blacks. Everything has now been reconfigured to be zeroed out in the center of the slider now as well. My initial reaction to this was not very positive. I thought that this might have been yet another attempt by a software developer to make something “simpler” that actually removed some functionality. I’m not sure that’s the case here, though. Yes, things work differently, but I haven’t found anything missing. Nothing that I could do before but can’t do now. Some things, like adjusting the brightness of mid-range values, might just need a different approach now. In that instance, I find my self adjusting the Curve panel in place of using the old Brightness slider. Key here will be to remain flexible in your workflow and not to get hung up on the way you used to do things.

It’s early days and the whole point of these public beta releases are to generate user comments so that the final product can continue to be tweaked. With that in mind, I’m reserving some judgment at this point but I will mention anything interesting I stumble across as I continue to explore beta 4. I am very excited that Lightroom now handles video files and hope to work more with that in the near future. The Book Module also looks interesting, although I imagine I will continue to develop books in InDesign where there is more typographic control. I don’t need one program to do everything and would prefer that Lightroom stay focused on image processing and cataloging.

So far, my Lightroom 4 testing has amounted to importing a couple of duplicated folders from my Lightroom 3 catalog and playing with a few “trouble” images to see if 4 solves any shortcomings of 3. The bike shot at the top of this post is one that didn’t really have major problems, but I thought it might be worth exploring again. First I brought it into Lightroom 4, created a virtual copy (so that I could later compare it to the original 3-rendered version) and did the auto-conversion to the new 2012 process version. In this case, I found that 4 rendered the image a little flatter than 3 had. Next I zeroed everything out and started from scratch, processing the image more or less from top to bottom through the various Develop panels.

In the end, I felt like the 4 version had a little more snap. You can see the two in a comparison window in the screenshot above. Lightroom 3’s version is on top and beta 4 is on the bottom. Is the extra snap due to Lightroom 4? Maybe. But I also know that I can process the same image on two different days and get two different results. Every decision is subjective and there are few right and wrong answers when processing your images. I may have just been looking for a little more contrast today, whereas it was closer to the date of the shoot when I processed this image in Lightroom 3 and I might have been trying to more realistically portray the grey, rainy day as it was fresher in my mind at the time.

The real differences will come as I explore more images with huge contrast ranges or massive highlight issues. I think that’s where the new processing power of Lightroom 4 will really shine. I’ll be sure to share examples as I find them.

Rainy day strategies

[sponsored post]

Stewart Island lies off the southern tip of New Zealand’s South Island. In this shot we’re just over the peninsula from the Island’s one town, Halfmoon Bay, and are overlooking Golden Bay, Thule Bay and the Paterson Inlet. Today’s destination is Ulva Island — a small, 670 acre island in Paterson Inlet that is being restored to its original predator-free ecosystem.

It’s also raining, which can make shooting photos during our walking tour challenging. I don’t have any waterproof housings but I do have a jacket and opt for a two body, two lens operation today. I’ll take the Nikon D700 with a 60mm macro lens and the D7000 with the Tamron 18-270. Here’s my thinking:

We’ll largely be in fairly dense rainforest where the reduced contrast of the overcast sky will actually help even out the light. I won’t want to include a lot of sky in any shots since it’s flat grey so I will instead focus on details — macro shots of the plants that we encounter on the walk. It will also allow me to shoot downward for the most part, eliminating the problem of rain getting on the front element of my lens. Neither camera-lens combination is large, so I can keep them both tucked into my partially zipped jacket and retrieve them only when needed. The second body with the 18-270 will be reserved primarily for those times when I encounter something that suddenly requires more than a prime 60. That might be a wide shot where the trail opens out onto a beach, or a telephoto shot of a bird. Birds are a large part of the visitor experience to Ulva Island so I hope to get something along those lines. By taking the 18-270 and a macro, I figure I’m set for nearly anything and I won’t have to deal with changing lenses in the rain.

Overall, this plan worked well. Once we made our way off of the beach and into the understory, the rain effect was lessened by the trees overhead, although the occasional drop that would land now was a much larger drop from a leaf than the small, misty raindrops on the beach. The trails wound through ferns and forgotten-looking plants that gave a real sense of what New Zealand must have once been like, before the main islands were largely cleared of trees for cultivation. I’ll show some of the macro shots in the next post but first I’ll show a couple of shots that made me thankful to have had the 270 end of the Tamron 18-270 zoom.

This tiny bird is a Toutouwai, or Stewart Island Robin. On the much larger end of the scale is this South Island KaKa:

A member of the parrot family, Kakas are about 18″ long and weigh a pound on average. That’s a pretty sizable bird. The Kaka didn’t come nearly as close as the Robin. There was another group a few yards ahead of us that he was curious about but the addition of our group coming up behind eventually proved too much and he took off. I was happy to get the images I did with the 18-270, but can only imagine the shots that a person could get with a little more time and patience on this island. For the most part, the birds are not that suspicious of people and will come fairly near. The haven’t really learned fear.

In the next post, I’ll share a few of the detail shots I took on this hike with the macro. Given the weather and limited time, I think the two lenses really allowed me to cover a lot of ground photographically speaking.

I should also mention one other foul-weather tip — the landscape at the top of this post (also shot with the Tamron 18-270) was fairly grey and colorless due to the overcast skies and impending rain. Once I brought it into Lightroom, I opted to alter the white balance to give the scene a cooler, blue cast. The result resembles the light you might get just before dawn or after sunset, even though it was shot near mid-day. Filters can also be used on-camera for this effect but, anymore, I prefer to leave my options open for playing with different color temperatures at the point of post-processing instead. By shooting in RAW, I have the ability to make several versions in different tones without any damage to the original image. One of the great benefits of today’s digital photography tools.

Yellow-Eyed Penguin encounter

[sponsored post]

It all started when we visited the fossilized forest at Curio Bay on New Zealand’s southeastern coast. In the photo above, you can see one of the ancient, petrified trees that are visible in the rock at low tide. We were told that the endangered Yellow-Eyed Penguins are frequently spotted in the area but that they are usually only making their way between the ocean and their nesting areas at sunrise and sunset. As we were there near mid-day, it was doubtful we would see any. If we did, however, signs instructed visitors to keep at least two car-lengths away to make sure the penguins could go about their business undisturbed.

Wanting to get clear of the bulk of the tourists at the site, I picked up my pace and headed for the far end of the rocky beach where I found some great examples of the petrified logs and stumps and began photographing them. A few moments later, a sound caught my attention and I looked up to see two Yellow-Eyed Penguins emerging from the underbrush at the top of the beach.

One was more bashful and stayed in the shade but, as I continued to photograph them, the other made his way cautiously onto the beach. I picked a location where it looked like he would cross my path, but where he wouldn’t come so close that I would disturb him. Once again — as had happened on several occasions on this trip — I was happy to have brought along my Tamron 18-270mm zoom lens. I hadn’t been expecting to be photographing wildlife at this location and had nearly come to the beach with only a 17-35. Luckily I’d decided otherwise and now the 270mm end of the Tamron was just what I needed.

I wasn’t too aware of what was going on behind me until the penguin had gone and I turned around to leave. It was then that I noticed that a large group of people had assembled behind me and had been photographing the penguins as well. One was a fellow photographer from my group who had, unfortunately, come to the beach with only a 60mm prime lens. He’d made do and gotten some nice shots but he certainly didn’t have as many options available to him as I had.

Here are a couple of shots — first, just as the penguin re-emerged after walking behind a large rock:

That shot’s cropped a bit, but it’s sharp enough to handle it. I mainly cropped it to get rid of some distracting gull poo in the foreground. Proof that you can’t control everything in the scene. The next shot is closer to full frame but is also cropped a small amount just to get rid of some visual noise around the edge of the frame and also to show the penguin a bit better at the small size required by this blog template:

I don’t generally like to crop photos after they are shot. Coming from a background of shooting transparency, I learned to crop in-camera. It was a necessity. I’m only recently embracing the ability to crop and re-frame images in Lightroom or Photoshop. Files captured by modern DSLRs are now large enough that there is some lee-way. You can crop an image down a bit and still have a reasonably large file that will be viable as a stock image. I continue prefer to “get it right” in-camera whenever possible, but it has become a welcome byproduct of digital photography that I can now tweak an image’s crop later to make it stronger. Especially in situations like this where time was limited and I wasn’t able to reposition myself or to get closer just to eliminate some distracting element in the foreground or background.

Wicked weather

I’m still catching up from having been gone the better part of April. In some ways my days seem to be mirrored by the current Midwestern weather — chaotic and unpredictable. Thankfully my situation is far less dangerous than the weather system. My heart goes out to all of those who have been affected by the recent tornados and other severe weather in Missouri, Kansas, Oklahoma, Alabama… seems like just about everywhere this year. I’ve lived in the central part of the U.S. all of my life and can’t remember another year like this one.

The shot above is not from this weather system but from a brief rainstorm in the South Pacific last month. Lightroom’s contrast, curves and clarity provided a little extra intensity. You can practically make a sunny day look like a supercell megacyclone with the tools we have available to us these days.

I like my water clear, thank you

Adjusting this photo from Saturday’s NE Kansas excursion was a little more work than it needed to be. This is the Buffalo Soldier Memorial at Fort Leavenworth and apparently someone thinks the water looks better dyed an unnatural blue/green color. That, or it’s been this way since St. Patty’s day. Maybe there is some other perfectly reasonable explanation for the water’s color, but it looked really, really strange in the falls below the sculpture. You can see for yourself in the un-fixed horizontal version below:

Note to all fountain owners — green water doesn’t look better! In Lightroom, I had to go through a whole process of selectively desaturating the aqua range of the color spectrum and painting in with the adjustment brush a combination of increased contrast and desaturation until things were looking somewhat natural again. Whew.

By the way, I was also putting a new camera bag through its paces on Saturday. For my upcoming Fiji trip in just a few days, I picked up a new Think Tank Sling-O-Matic. Here’s a photo of it from their site:

I had originally planned on getting the smaller Sling-O-Matic 10 but it wasn’t in stock locally and upon seeing the size of the 20, thought it might better fit my gear. This bag is slightly smaller than my Think Tank Airport Ultralight and is a sling-bag instead of a full backpack. While I’ll miss the distribution of the weight across both shoulders, I welcome the ability to swing the bag around to access lenses without taking the bag off.

The bag worked great on Sunday and I look forward to seeing how it does on a longer trip. My Ultralight fit nearly every overhead compartment I encountered although it was a bit tight in some. This one should slide right in, but the laptop will have to be carried separately in its own sleeve. There is a side pocket that will take the laptop on the Sling, but an inch or so sticks out and I’d be a little nervous that it might work its way out while out of my view on my back (the way the pockets work is that they’re top-opening when you sling the bag ’round front, but are side-opening when worn on the back).

I’ll report back after the Sling has logged a few air miles.