Category Archives: software

The mother of all upgrades

It’s an exciting and scary week around here. I’ve been putting off upgrading my old G5 Mac tower for far too long. It was running fine but beginning to get a little tired. I could respect that. I get a little tired, too. But then Snow Leopard came along — running only on Intel-chipped machines — and I began to fall behind. Still no biggie. No real urgency. And that became my downfall.

Now we have an update from Adobe to the entire Creative Suite — CS5. A few days later, Lightroom 3. I held out until after the WWDC just in case Apple made any updates to the Mac line-up (something without a shiny screen maybe?) but, when there weren’t, I pulled the trigger and placed my order. Or should I say “orders”. Piles of boxes have started to arrive and the installation process has begun but I think I’m in for a multi-day process. Common sense has always told me to just update one thing at a time. Then, if something goes crazy, you know what is likely to blame. There will be no such common sense this time. New hardware and all new software. If there is a conflict, I’ll have one heck of a time figuring out where it is. Luckily, that doesn’t happen as much as in the old days. I also tend to stick with just the necessary software — not a lot of system modifiers, etc. that can lead to trouble. Call me overly cautious but I make my living with these Macs and I don’t care to spend my time trouble-shooting software conflicts when I can be billing hours.

With all of these updates there will be a slight shift in the focus of this blog. I plan on doing more technique and how-to posts, sharing what I learn about the new features in Photoshop CS5, Lightroom 3, Aperture, etc. We’ll see how it goes but this may be just the first phase of this new direction. Exciting times for sure.

Adobe CS5 announced

Just a quick note to say that Adobe has announced Creative Suite 5 today, including Photoshop CS5. That’ll put a hitch in my day. Guess I’ll be watching new feature demos ’til the cows come home. Rather than list a bunch of links to the product information, I’ll just link to the post I ran across on John Nack’s blog. He has provided links to several sources and will surely keep it updated as new reviews surface. Actually, upon further inspection, I see that he has started a CS5 category here for future posts. Shipping for Photoshop CS5 should begin within 30 days, according to the press release.

Happy 20th birthday, Photoshop!

PS: Does anyone else think it’s odd that Lightroom isn’t part of Adobe’s Master Collection or the Creative Suite for that matter? And Lightroom 3 does not seem to be a part of this announcement.

Back in the office

100406lightroom_sotc

I’ve been back from Thailand for a week now but I’m still in the thick of organizing and processing my images from the trip. I’ve ended up with about 5000 “keeper” shots after purging the really bad stuff. Those images have all been renamed and filed with the most basic location information included in their description fields (city, province, country, continent). I’ve also added rough star-ratings but they will undoubtedly change as I begin the actual post-processing. That’s where I currently stand — I’m ready to begin making color corrections and other adjustments to get these images ready for submission to stock agencies and publishers. I’ll also need to keyword everything. Normally I would wait until after making corrections to keyword but I’ll probably jump back and forth between editing and keywording this time so that I don’t end up with a mind-numbingly long keywording task at the end.

Not all 5000 images will be distributed. There are lots of near duplicates as well as bracketed shots for HDR and sequences destined to become stitched panoramas. There are also lots of shots that I take for reference like signs that show the name and spelling of a place. This isn’t the most glamorous part of being a travel photographer but it’s necessary. Taking the photos is just the beginning. Getting them into the market and in the hands of photo buyers is crucial if you want to make a living.

Grape harvest

090928vineyard_sotc

Yesterday morning found me back at Holy Field Vineyard and Winery, shooting the harvest. The grapes weren’t quite ready for last week’s visit but this time the parking area was crowded with cars and the fields filled with people picking and toting fruit.

I went to the ground for this shot and held my D700 with the 17-35 Nikkor down in the grass, blindly pointed upward. I had imagined the shot as being a silhouette as the sun was directly behind the central worker but once I opened the file in Adobe Camera Raw, I was amazed at how much detail I could actually pull out of the shadows without losing the blue sky. In the past I’ve found that the Fill Light slider would create some weird outlines along high-contrast edges if taken past 10 or so. Here I’ve cranked it up to 54 and things look fine. I’m not sure if that’s an improvement in ACR, or the D700’s files can handle it better, or if this particular shot is more forgiving. At any rate, the recovery is amazing.

Revisiting Greece

mykonos steps

I thought I’d try something a little different tonight and revisit an old file — one that I didn’t really consider a keeper before — and see what I could do with it. I went back to the first international trip I made after switching to digital. It was a trip to Greece in 2003.

It’s not that I hadn’t shot digital at all before this, but Greece was the first trip I made with only a DSLR and no film body. I was shooting RAW with a Nikon D100 and this particular image was made with a Nikkor 17-35 at 17mm.

I’d never made a serious attempt to post-process this shot because it had a huge contrast range that made keeping the church tower from blowing out while holding the detail in the shadows very difficult. This evening I made two versions in ACR, one exposed for the highlights and one for the shadows. I put the highlight image on a layer above the shadow image and painted in a mask using a Wacom tablet to let the shadow detail come through. Throw in a few smart filters and there you go. Not perfect but not bad for a few minutes work.

Could I have done this with the software that was available back in 2003? Probably. But I’m pretty sure it would have taken me a lot longer. It’s pretty great having old RAW files around knowing that, as the software progresses (and hopefully my skill level as well) I can go back and reinterpret images to get better or at least different results.

Forces of progress

Shanghai financial district

I still have a few more photos from China that I want to share before my next trip begins on the 1st of February. This is a shot of two of the tallest buildings in China — part of Shanghai’s Pudong new development area. This area has sprung up from nothing in the last two decades and is now a symbol of both Shanghai and a changing China. Such a symbol that my main goal for this trip was to get a good, iconic skyline shot from across the river with the futuristic Pearl Tower and these other giant skyscrapers. More on that effort in the days to come but I’ll use this shot to talk about the shelf-life of Shanghai skyline photos.

In the guidebook I purchased just prior to my trip (published in 2005) photos of this area showed only the 88-story Jin Mao on the left. It was then the tallest building in China. The building on the right has since popped up — taller — and is now the tallest building in China. Great time to get some new, updated skyline shots, right? Surely that guidebook publisher is looking for new images when they go to reprint. But wait. Construction is already underway just blocks away for another new building that will eclipse both of these towers. Looks like my shots will be stale in a few months time, too.

Just as well. Even though it looks like a beautiful day in this shot, haze made getting a distant skyline shot difficult during my two days in Shanghai. I’ll post a few shots that I did manage to get during that time over the next couple of weeks but that twilight shot of sparkling towers reflected in the river just never came together for me. Flexibility is the name of the game, though. There’s always something to shoot.

Progress has also been affecting my life in other ways lately. I’ve recently updated all of my Adobe software to the CS4 versions. That would include Photoshop, InDesign, Dreamweaver, Flash, Fireworks, Lightroom, Contribute… you get the picture. It’s always a little unnerving to update so much software all at one time — especially software that you depend on daily for your livelihood — and there have been a few hiccups but nothing insurmountable. It’s just that darned learning curve again.

Don’t get me wrong — I love to learn new things and I thrive on change — but there’s just a whole lot at once right now. Beyond the software, I’m still sorting out my new travel kit and the new D700 and D300 bodies. I finally decided it was time for a new bag, so I ordered a Think Tank Photo Airport Ultralight.

think tank bag
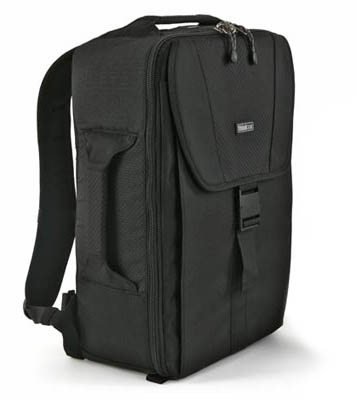
This bag weighs in at just over 2 pounds when empty so it adds very little to the carrying weight which is a major concern of mine, especially when getting through airports. The dimensions look good for the overhead bin and it has a very sleek outer surface that should avoid snagging as it gets stuffed in. I’ll typically still pack a small bag in my checked luggage that I can use on the street. Backpacks are great for getting all of your gear to a location, but they’re not so convenient when you’re trying to get to a lens fast on a busy Shanghai street. So far, I’m very impressed with this as a travel bag and look forward to putting it and all the other new stuff through their paces next month.

Seventeen days and counting until my 2009 travel year begins. I’d better start going through that 400+ page D700 manual.

Texture experiment #152

Texture test

I’ve long been interested in finding a way to get that messy edge similar to what you see on Polaroid transfers but I want to achieve it in Photoshop and in a way that I can easily reproduce it without having to go through too many steps. Today I revisited this project and moved a little closer to my goal. Through the use of various texture shots I’ve collected over the years, masks made with rough-edged brushes and a liberal use of layer blend modes, I can now drop any image into this Photoshop document and it will give the above result with minor tweaking.

It’s still not entirely what I was shooting for. I wasn’t initially going for the overall aged look — I just wanted the edge. But, to my eye, the edge fit better when I textured the entire image. I’ll keep playing with it. Every attempt comes closer…

Peyto Lake Panorama

Peyto Lake

I returned from Canada late Saturday night and jumped right back into work on Sunday. Today I finally had enough of a breather to start the post-processing from this trip. The shot above is a pano created with the Photo Merge command in Photoshop from eight separate shots I took at Peyto Lake. I shot them vertically from left to right, handheld, with a fair amount of overlap between frames. What I ended up with is a 70+ megapixel image that has detail that’s hard to believe. I am so spoiled by Photo Merge. This would have been hours of work to manually fit these images together.

More Canada photos to come as I work my way through the files. It’s almost like taking the trip twice — although I’d much rather be there in person again. What a great location and great people. I hope to get back soon.

Aperture 2 released

Aperture 2

Apple has released a new version of Aperture. I’ve never tried Aperture myself. It looks interesting enough but my poor, aging G5 has never met the minimum requirements to run it. Now, however, it seems Apple has lowered the requirements to the point that I just sneak in. Or I’m reading something wrong. At any rate, I look forward to downloading the free trial and seeing what it can do but it will have to wait. Too much work right now with my trip to Banff just over a week away. Patience, patience…